
what is game design? + character locomotion

Dear stranger,
About a month ago, I met a game designer at Naughty Dog who offhandedly mentioned that he does character locomotion for fun. I usually don’t think twice about other people’s pastimes, but his comment stuck. Should I be doing character locomotion for fun? Will I be a better designer if I spend all of my free time juggling AnimGraphs?
I’ve gotten into the habit of mimicking other designers’ behaviors for seemingly no reason at all. The epitomized example I like to share is that I use a sous vide cooker because a designer I admire recommended it to me (and it turned out to be a great recommendation). If I had to guess, I’d attribute that habit to outsourcing a sense of independence. It’s a common tendency among noobs in games; we play our friend’s main in Smash until we’ve become independent enough to realize that Meta Knight blows. We then choose a respectable main and begin to feel more kick-ass, more knowledgeable, and more like ourselves.
In the real world, outsourcing our behaviors to more knowledgeable people works up until a certain point. That point usually occurs when we have to differentiate between what’s a prerequisite and what’s a habit. In the case of the Naughty Dog designer, it was difficult for me to tell whether liking character locomotion implied being a good designer or vice versa. For my mathematically-inclined readers, here’s where I was getting tripped up:
{good designers} ⊂ {people who do character locomotion for fun}
or
{people who do character locomotion for fun} ⊂ {good designers}
Unfortunately, making that distinction requires a clear understanding of the members of each set, which is something that designers (and neuroscientists!) severely lack. The day-to-day of game designers looks pretty different at every studio. Naughty Dog has a reputation for hiring very technical designers, meaning that most people will have a taste for implementing things in-engine. Even then, character locomotion tasks might be passed off to other specialists, like animation programmers. Plenty of other studios differentiate between technical and non-technical game designers, meaning that you’ll find a fair number of good designers who don’t have the slightest clue how to use an AnimGraph.
So, we’ve established that {good designers} ⊄ {people who do character locomotion for fun} and {people who do character locomotion for fun} ⊄ {good designers}. That leaves us with a much more fundamental question: what the hell is game design?
When non-games folks ask me to describe what I do, I take one of two approaches. For the general population, I say that I make and program creative decisions. For folks in games-adjacent spaces, I might describe that I have an interest in combat systems and a background in AI behavior. But those descriptions are unsatisfying because they’re largely comparative or anecdotal; it tells us what game design is like, but not what it is.
Let’s start with the “design” part of game design. Wikipedia defines design as “a plan or specification for the construction of an object or system or for the implementation of an activity or process, or the result of that plan or specification in the form of a prototype, product or process.” The irony is that well-designed definitions should be understandable: this one certainly is not. Here’s my attempt at a more usable definition: design is the process of making decisions to serve a particular goal. Game design is just a way of specifying the end product.
Side Note: A lot of industry folks describe game design as “finding the fun.” I tend to avoid that definition because not every decision is oriented toward “fun.” Designers also make decisions around pedagogy, accessibility, and sensational goals, to name a few.
Whew! We’ve covered a lot of ground. Let’s get into character locomotion.
character locomotion for amateur designers
getting started
Locomotion, broadly, describes how things move around in an environment. Character locomotion usually refers to how the character mesh responds to cues in the environment and input from the player.
Let’s start with the third-person example project with starter content in Unreal Engine (any version will do, but I’m using 4.27.2). Hit play and move the character around using the arrow keys or WASD.
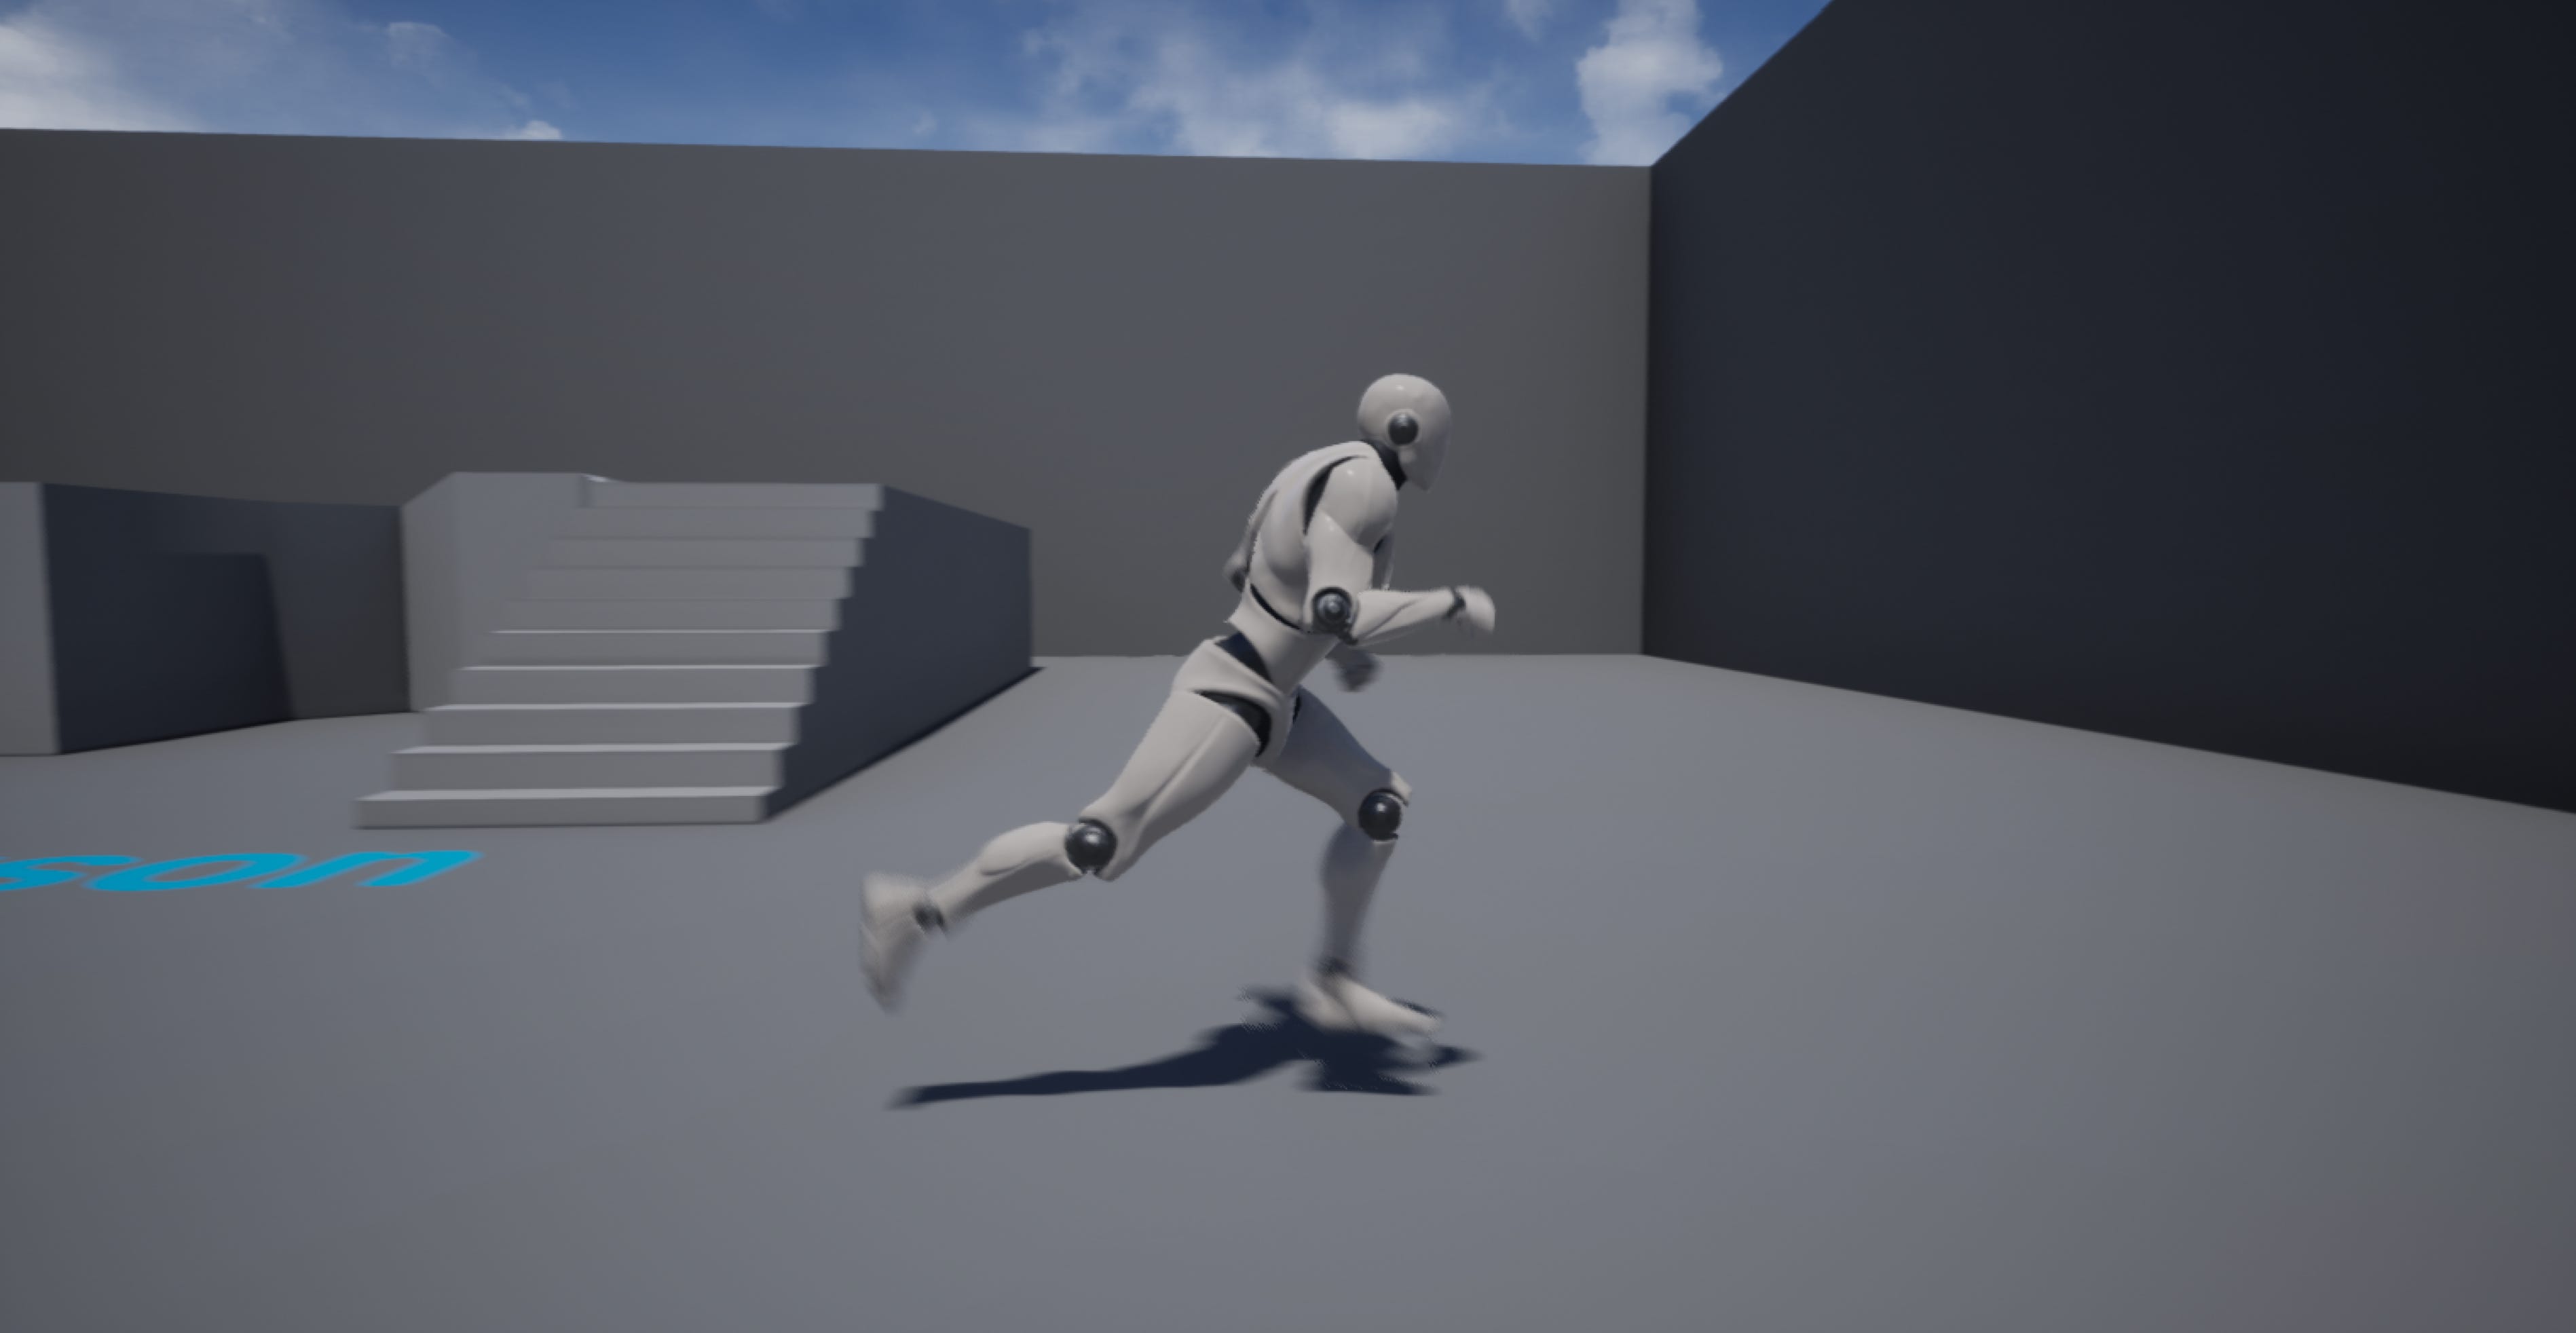
Looks great! The reason why so many designers take character locomotion for granted is that the starter content already includes a run-jump cycle. We’ll learn how to make a more advanced walk-run-sprint-jump cycle for the UE4 mannequin.
The first thing you’ll need is some looping animations. Looping animations give the illusion that the mesh is using its body to move when in reality, we’re just translating a capsule component around the screen. Here are three options you have:
Make your own animations in any 3D software and export them into UE4 as an FBX file (huge flex)
Use the Mixamo Animation Retargeting plugin to download animations from Mixamo and retarget them to the UE4 skeleton component (I usually go with this option)
Use animation packs available from the UE4 marketplace (popular choice)
blend spaces
After importing separate animations walk, run, sprint, and jump, we next have to figure out how to trigger those animations based on the player’s input and environment. We’ll be using a blend space, which is an asset that blends animations based on two values. The vertical axis will respond to the character’s forward velocity, and the horizontal axis will respond to the character’s right velocity.
Side Note: Why are we sampling the character’s velocity instead of the axis input from the player? Imagine that the player is inputting forward velocity while the character mesh faces an immovable object. If we sampled axis input, the character mesh would run in place, even though its velocity is zero. Sampling the character’s velocity is an easy way of accounting for additional physics from the environment.
Right-click anywhere in your content browser and select Animation>Blend Space to create a new Blend Space. In the Asset Details > Axis Settings window, set your minimum and maximum axis values to around -800 and 800, respectively, or as fast as you’d like your character to sprint.
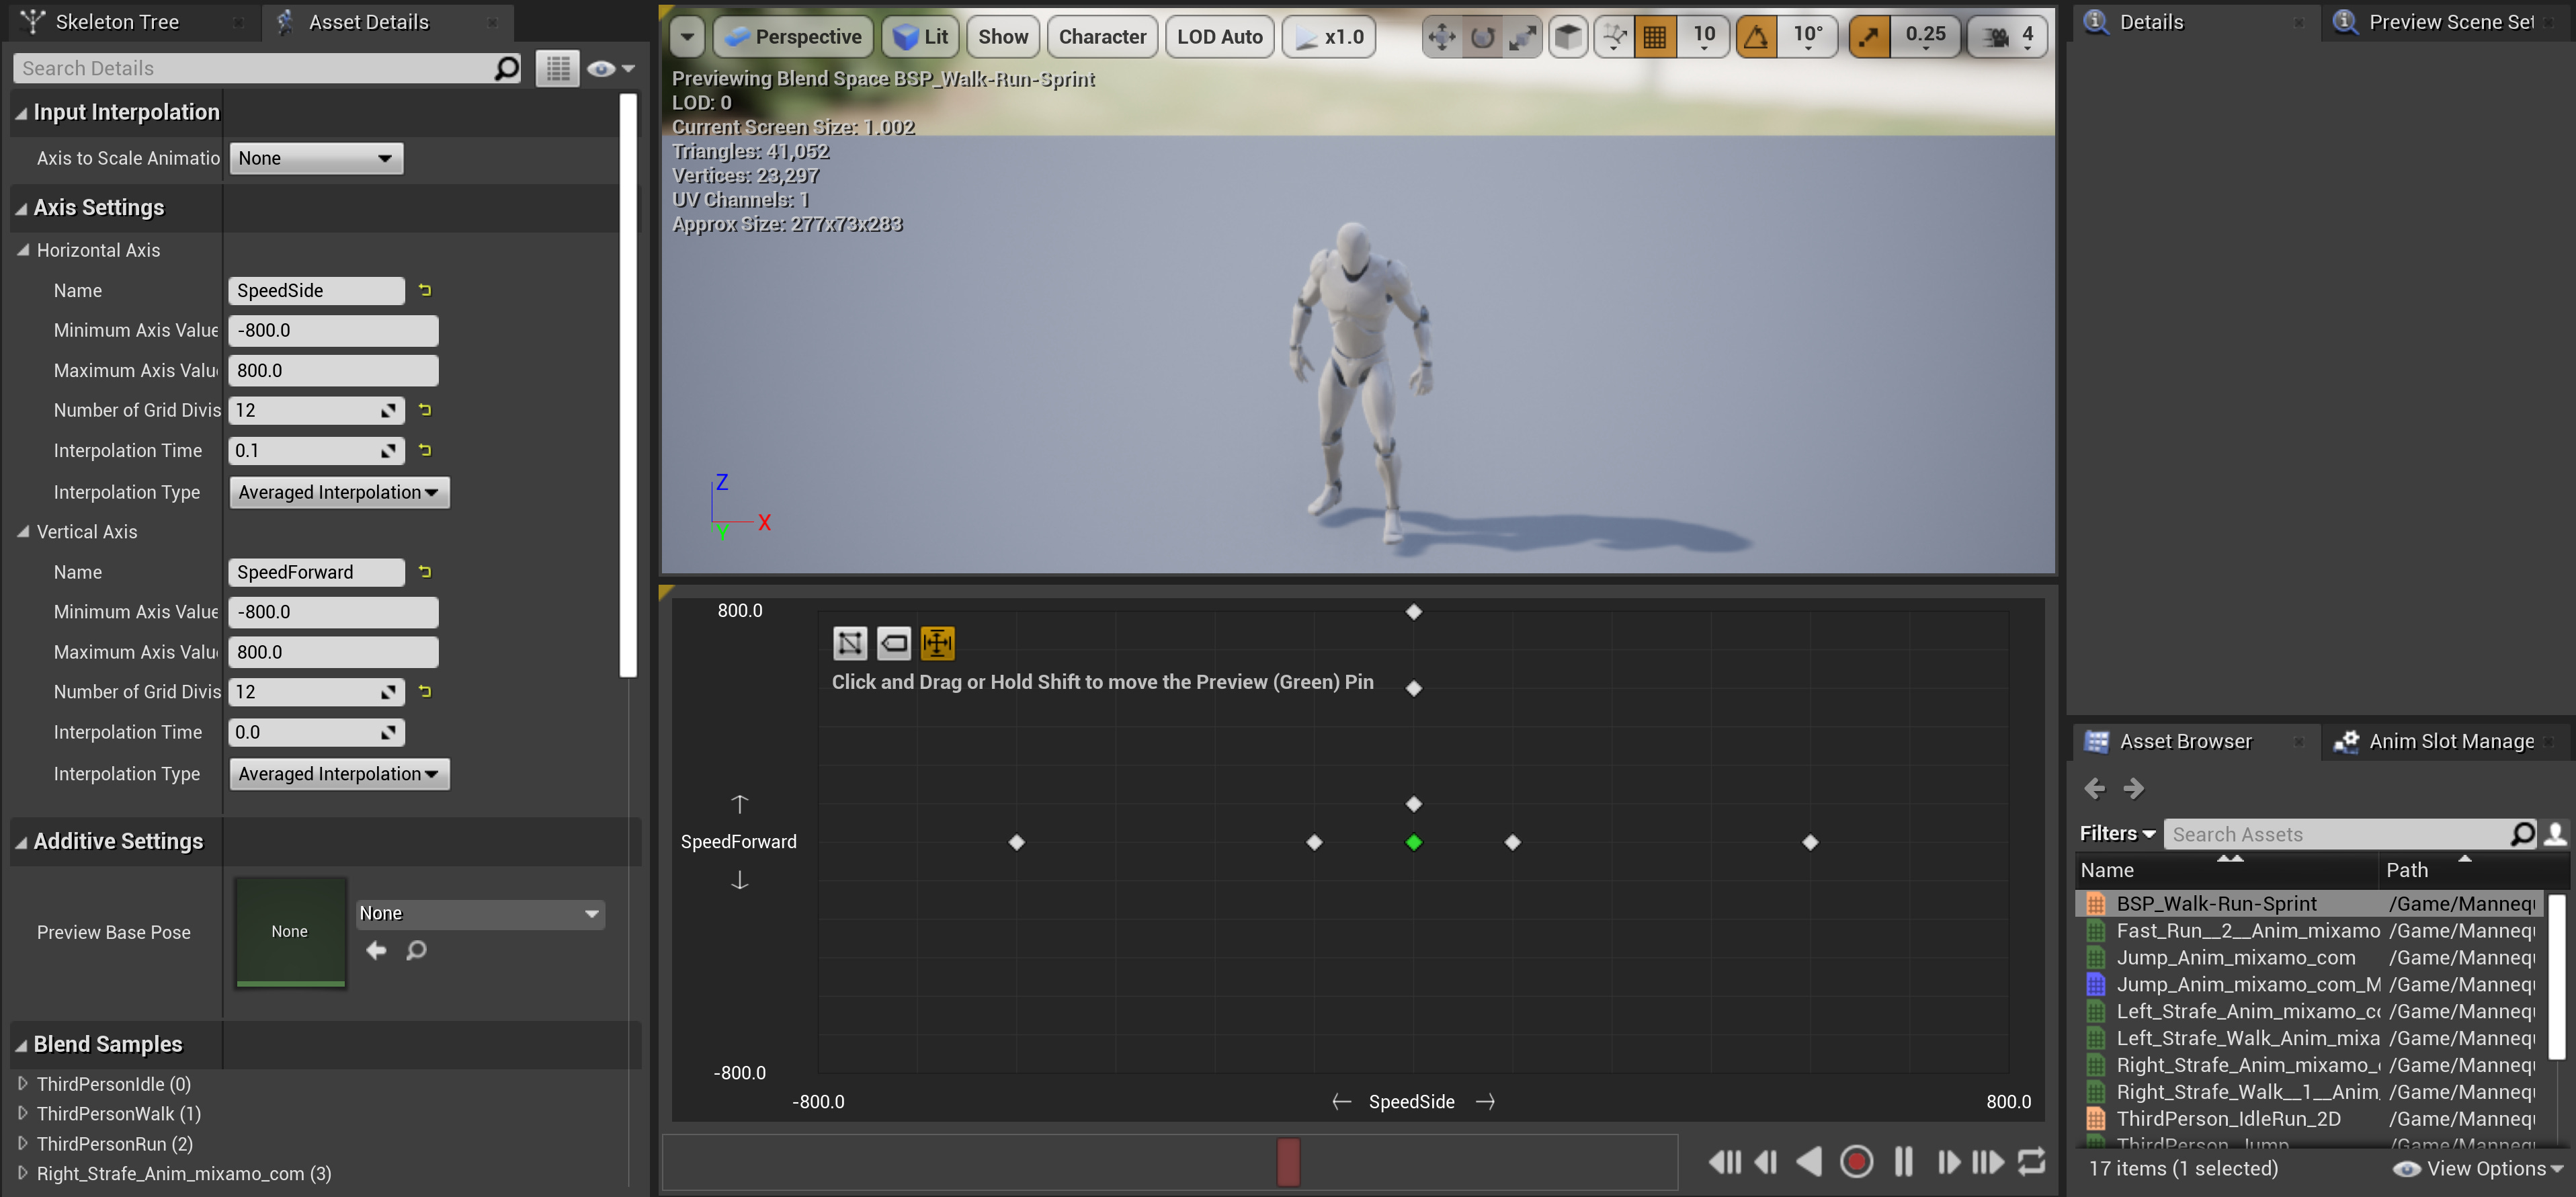
In the graph below the previous window, drag and drop the animation files into their respective velocities. To start, your idle animation should be set to (0, 0). I set my walk animation to (0, 133.33), run to (0, 533.33), and sprint to (0, 800). If you’d like to strafe, you can set those animations along the horizontal axis. Use the green preview pin to see how your character mesh will interpolate between different animations.
animation blueprints
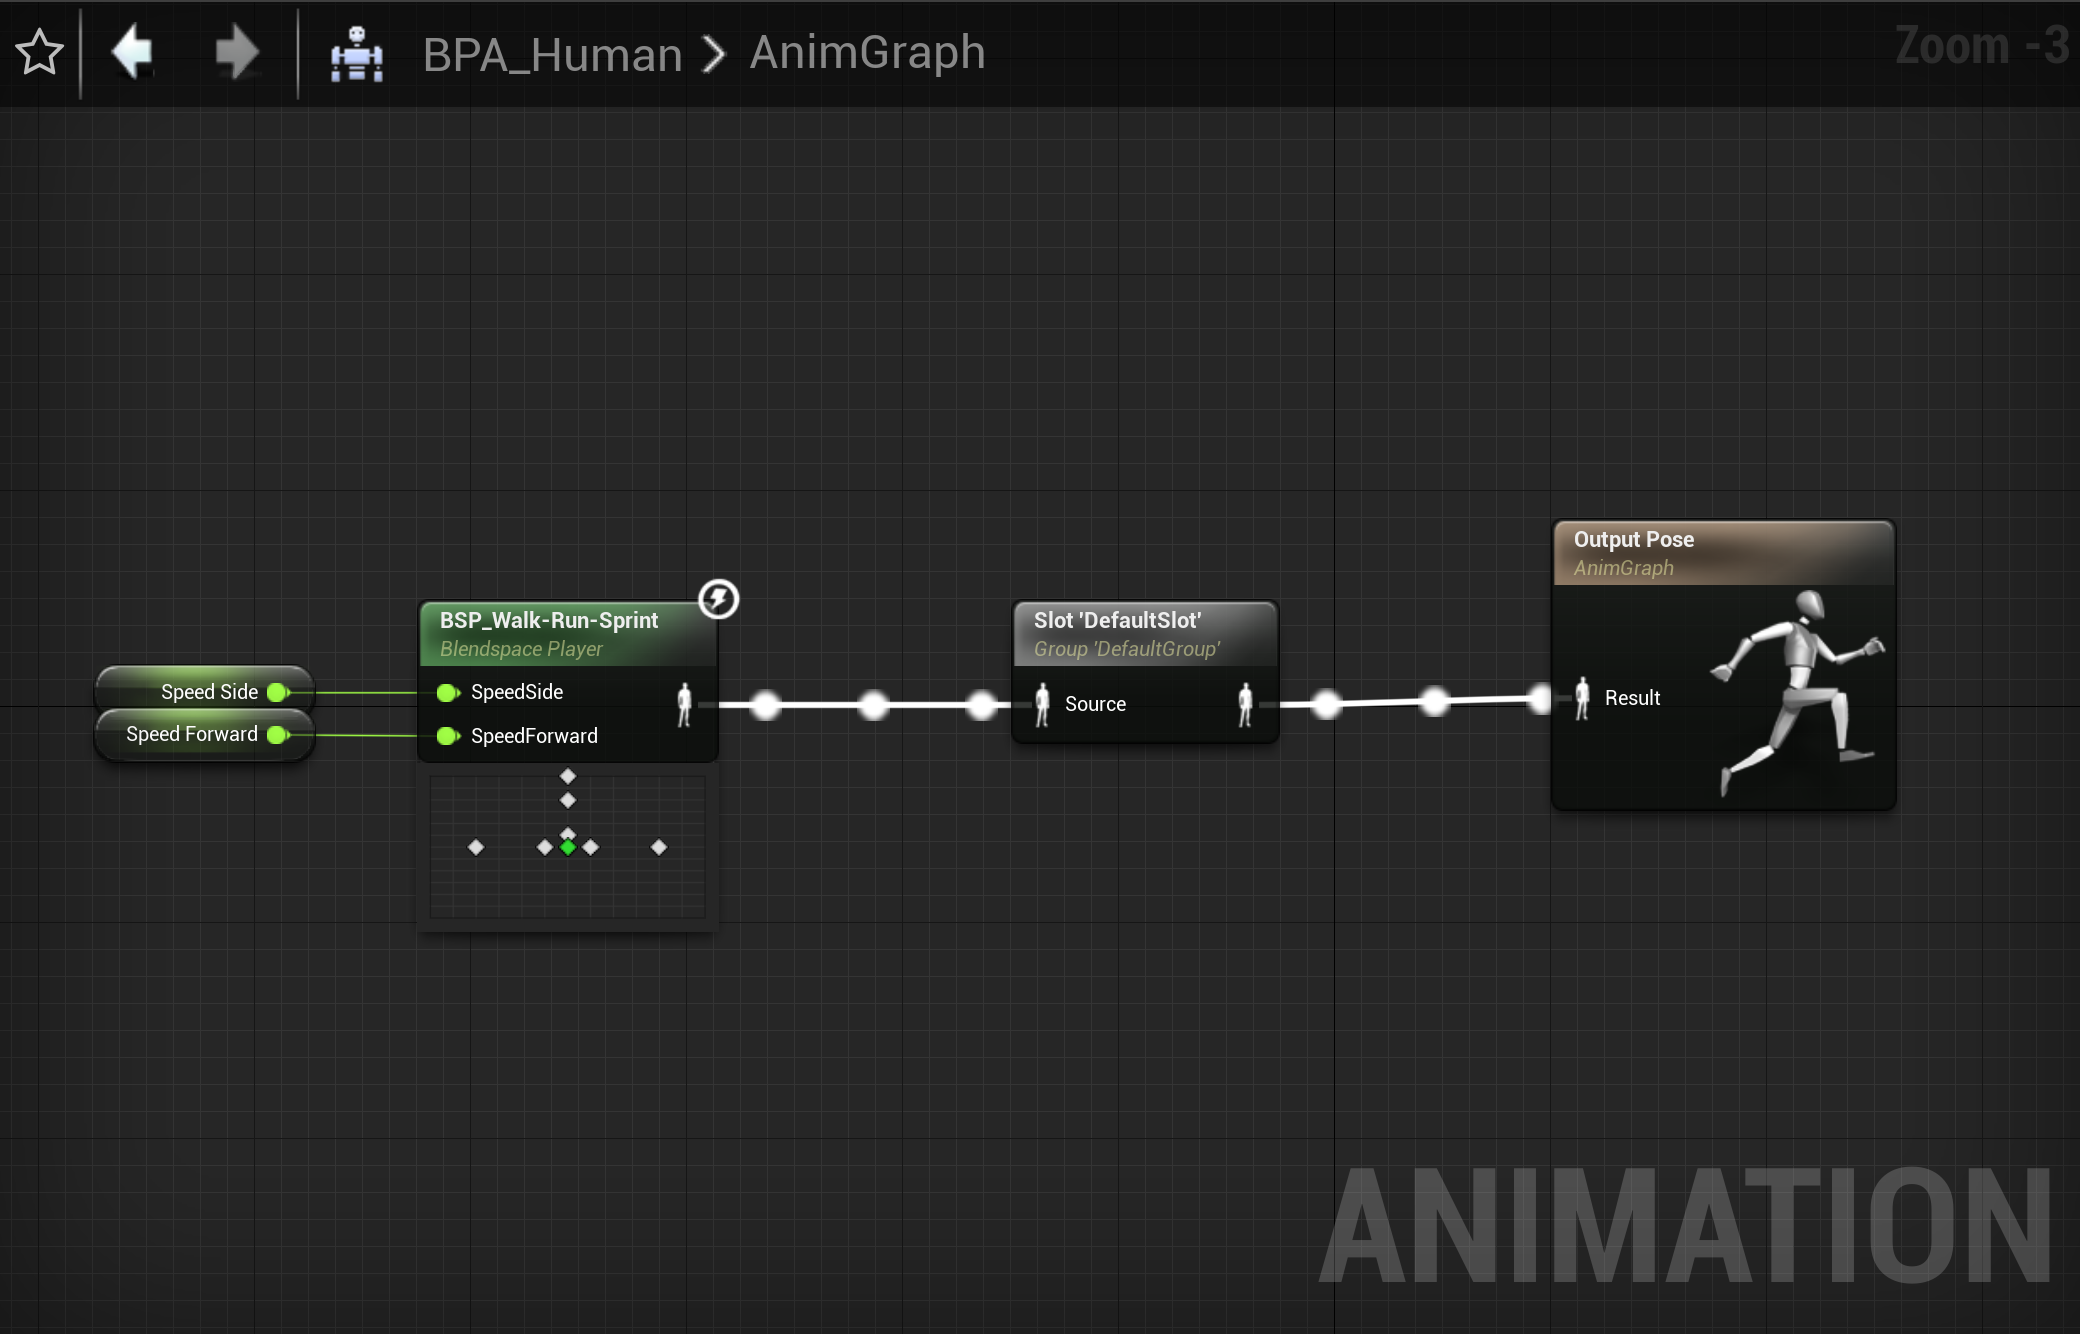
We’ll need an animation blueprint to control the skeletal mesh. Right-click in your content browser and select Animation > Animation Blueprint, then select AnimInstance and the UE4 skeleton in the pop-up menu. Then, drag-and-drop your Blend Space into the AnimGraph blueprint and promote the two inputs to variables. Before plugging everything into the final pose node, throw in a Slot in between. Slots allow other animations (like jumping!) to override the Blend Space animations.
Side Note: Remember to follow naming conventions! I use BSP_[Name] to name Blend Spaces and BPA_[Name] to name Animation Blueprints.
Next, we want the two variables we just created to borrow input from the character velocity, which we’ll set in the event graph. The below script is pretty simple; first, we’re grabbing a reference to our character, then we’re setting our variables to our character’s right and forward velocity. Remember that the formula for the dot product is A · B = |A| |B| cos Θ, meaning that we’re isolating the projection of the velocity vector A along the character’s forward or right vectors B.
Navigate to the ThirdPersonCharacter blueprint, and in the Components window, select Mesh. Then, in the Details > Animation window to the right, set the Anim Class to the one you just created.
custom inputs
If you hit play, you should see that your character can walk and run, but it isn’t fast enough to sprint. We’ll need a custom input for sprinting. In your main window, open Edit > Project Settings > Input. Under Action Mappings, add a keybinding for Sprint. While you’re at it, you can also throw in any other inputs you plan on using later.
In your ThirdPersonCharacter Event Graph, add an InputAction node for Sprinting. I like to have sprint on hold rather than a toggle. Off of the Pressed output pin, set the maximum walk speed to 800, and off of the Released output pin, set the maximum walk speed back to its default value.
Hit play and enjoy your walk-run-sprint cycle! Let’s tackle jumping next.
animation montages
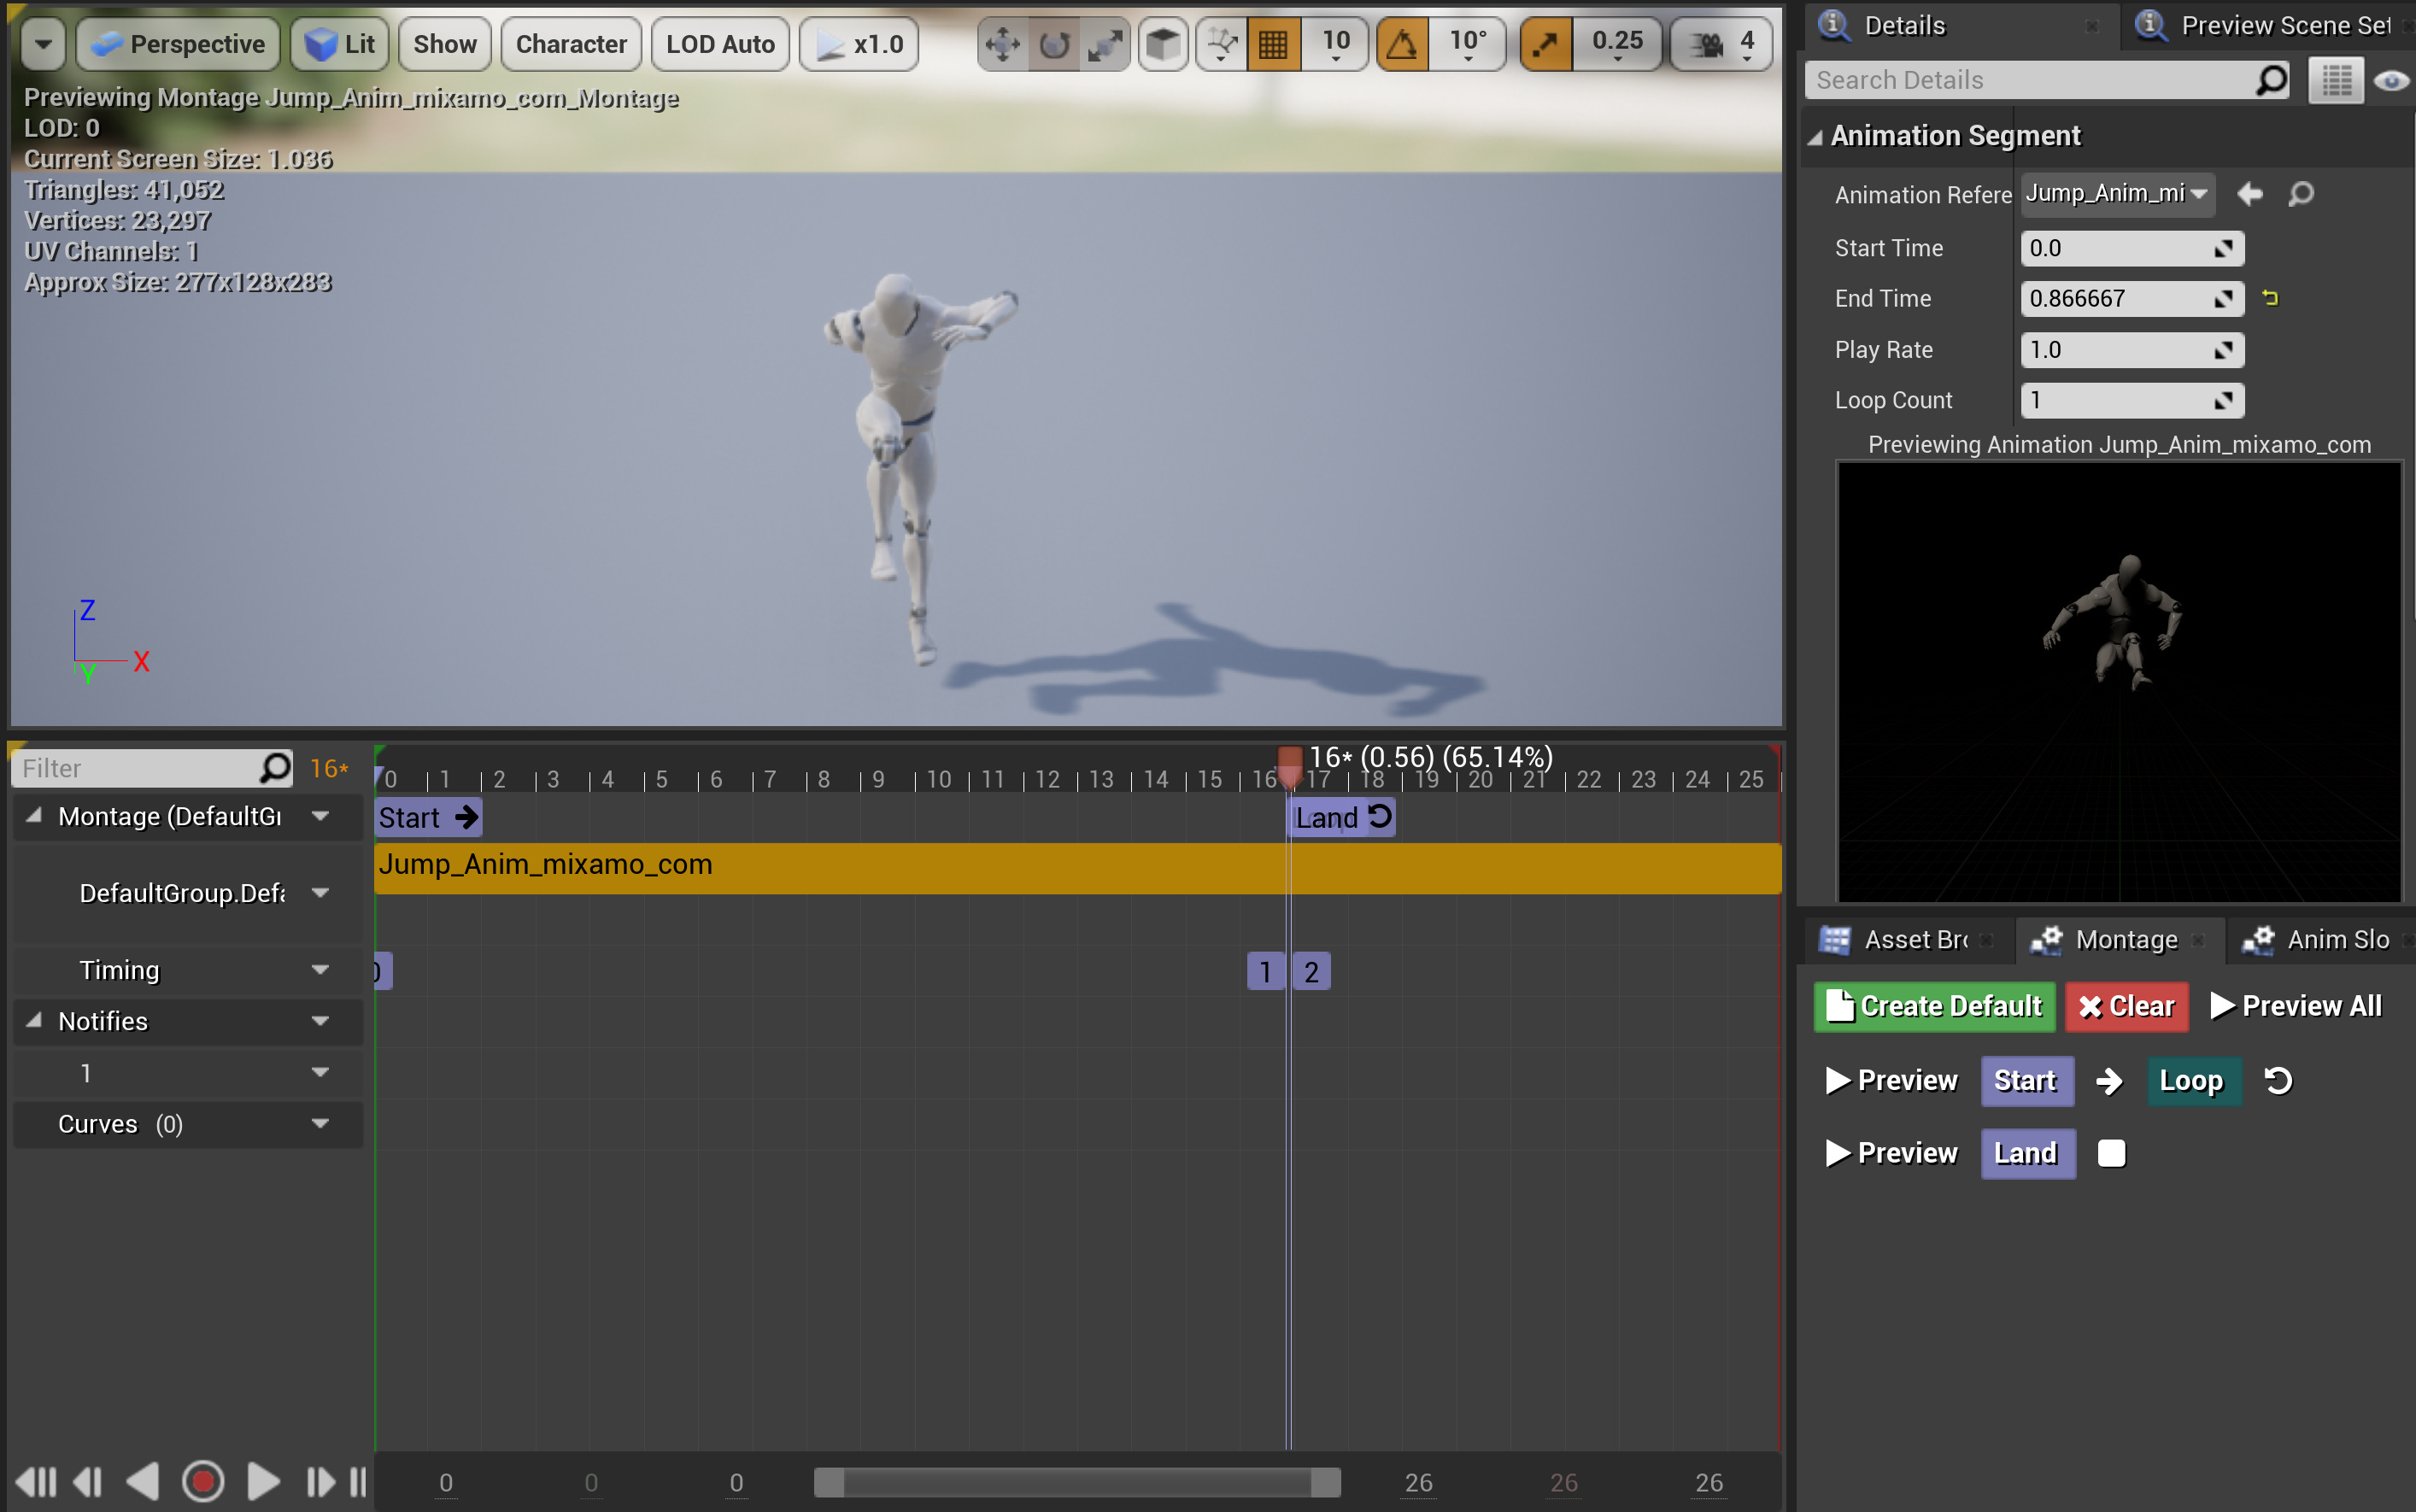
When you opened your ThirdPersonCharacter blueprint, you probably noticed that Jump was already implemented using in-built nodes, but it doesn’t have an accompanying animation. We don’t want to add it to the Blend Space that we created because jumping does not vary with the character’s velocity. Instead, we’ll be using an animation montage. As mentioned before, montages can interrupt Blend Space animations due to our Slot node, which we can also use for animations like crouching or combat.
Right-click on the jumping animation file in your content browser and select Create > Create AnimMontage. Play the animation a few times to get familiar with each of the components. One jump cycle has three components; take-off, hold, and land. We can use sections to delineate each of those components and access them in a script later. Right-click the montage track to create a new section for each of these components. In the Montage window to the right, clear the sections to split them up. After your take-off section, set your hold section. The section following your hold section should be the hold section again. This loop allows your character to hold a position while it falls mid-air.
Now that we’ve outlined each of those sections, we need to call them individually as the character jumps. Navigate back to the ThirdPersonCharacter blueprint. After the InputAction Jump > Jump node, add the following script.
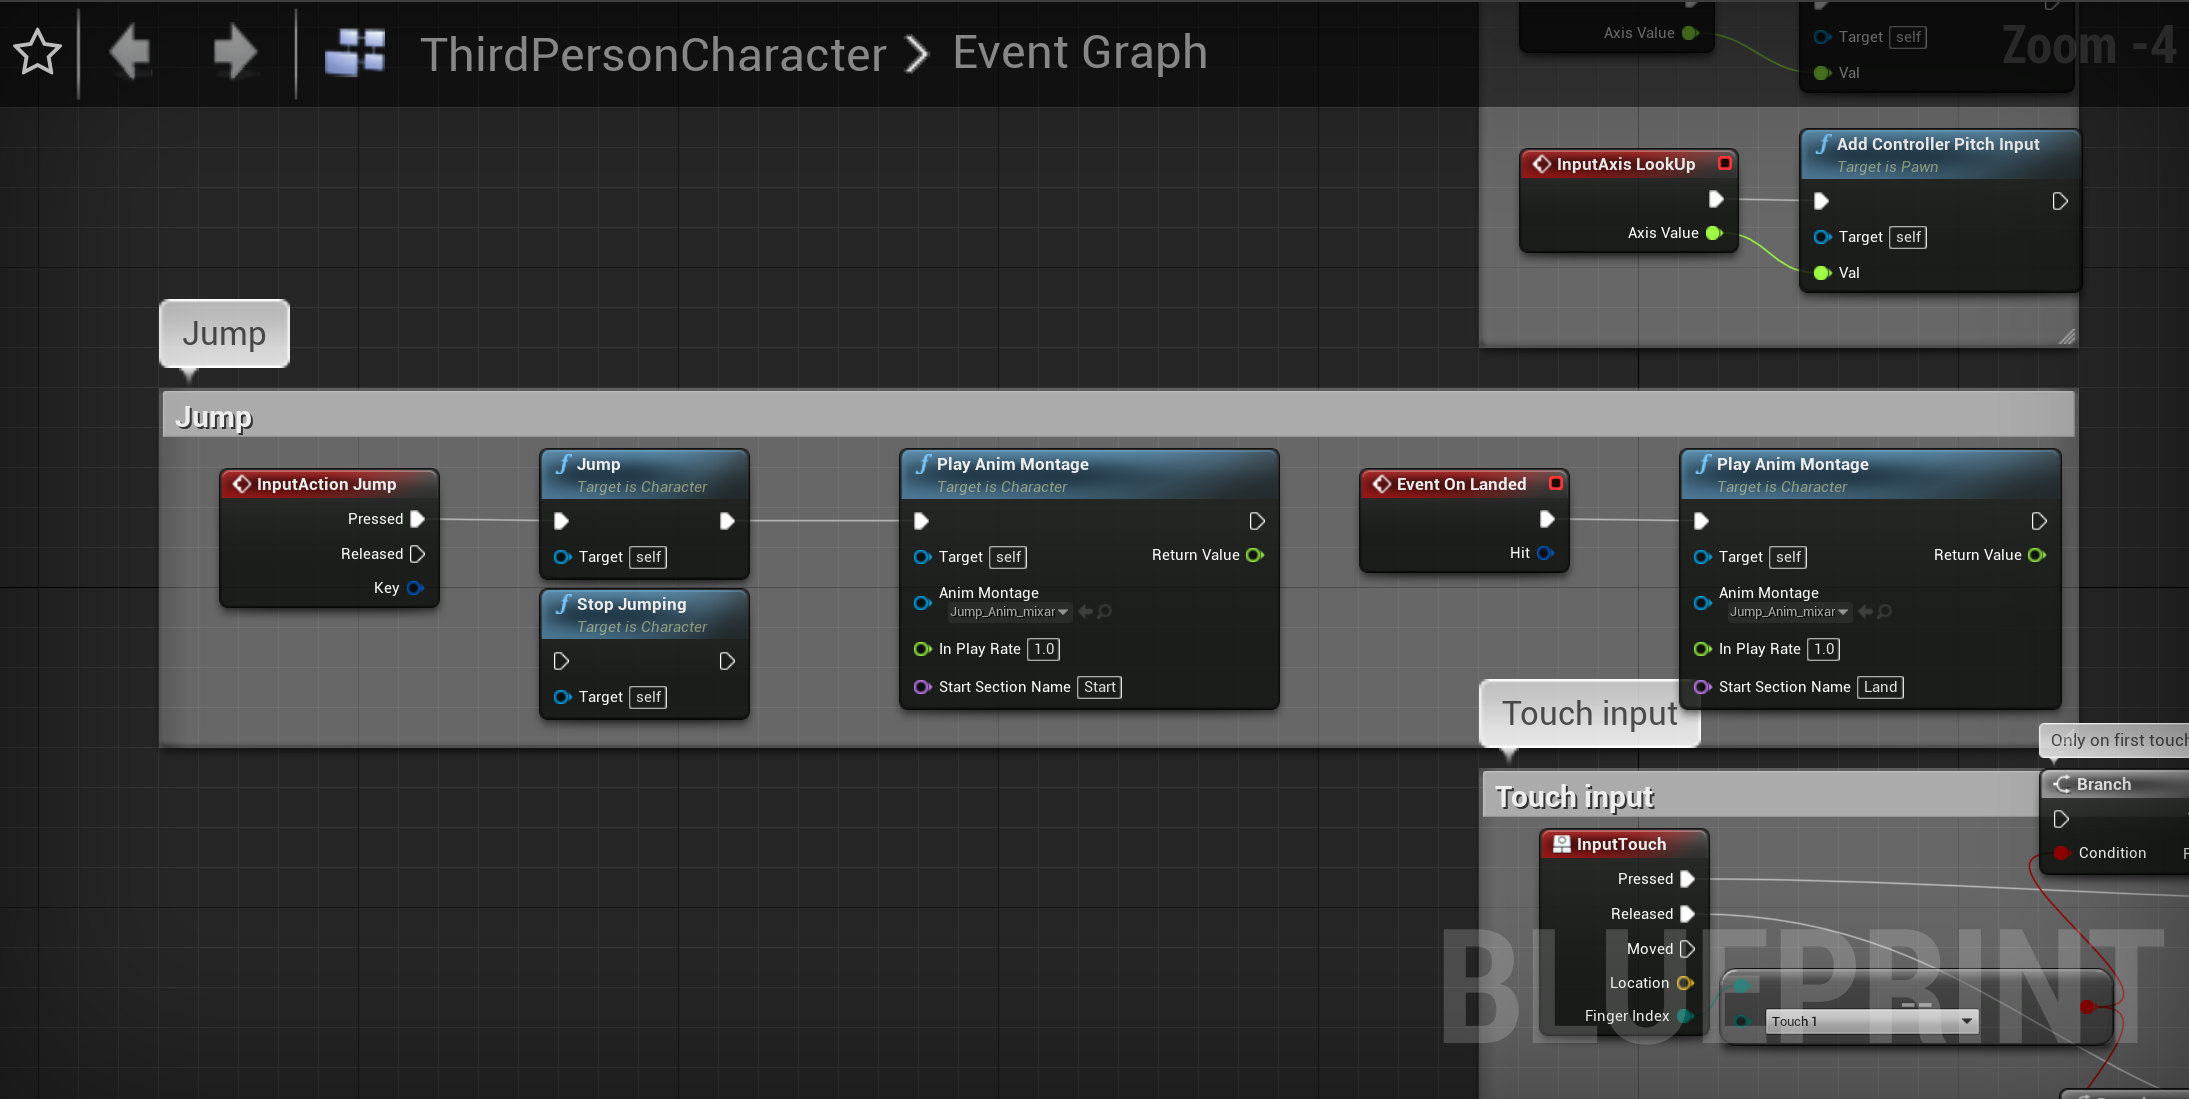
Essentially, we’re playing the take-off and hold section as the player jumps, then calling the land section as the character lands using an in-built node.
That’s all folks! Happy New Year! If you have any thoughts, drop me a line.
-NA